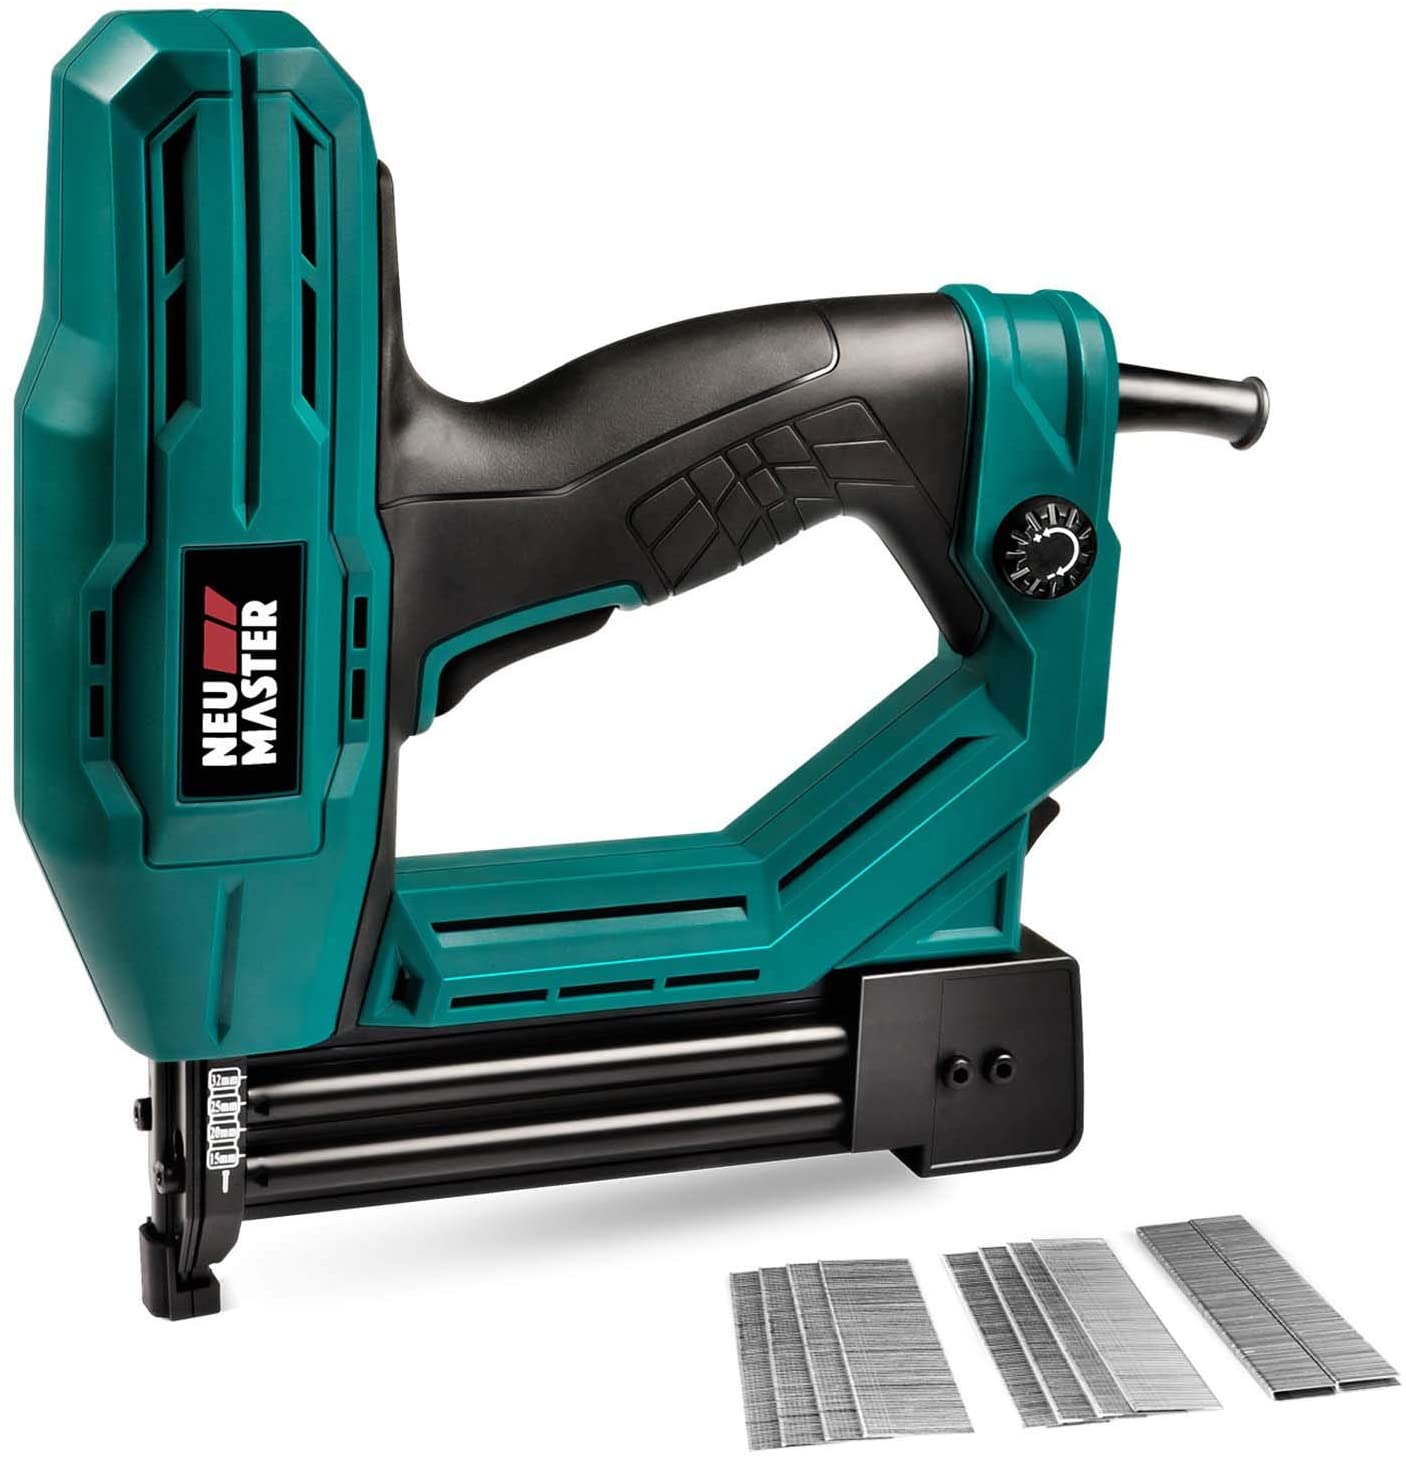
When it comes to installing baseboards, having the right tools can make all the difference. A brad or finish nailer for baseboard is an essential piece of equipment for achieving professional results. These tools ensure precision, efficiency, and a clean finish, making them indispensable for both DIY enthusiasts and professional carpenters. Baseboards not only enhance the aesthetic appeal of a room but also protect walls from damage, which is why using the right nailer is crucial for a seamless installation process.
Baseboard installation often involves working with delicate materials that require careful handling. A brad nailer is ideal for thinner and more fragile materials, as its smaller gauge nails minimize the risk of splitting the wood. On the other hand, a finish nailer is better suited for heavier baseboards and provides a stronger hold. Understanding the differences between these tools can help you determine which one is best suited for your specific project needs. Both tools are designed to streamline the installation process, ensuring that your baseboards are securely fastened without visible damage.
Selecting the right nailer for your baseboard project can seem overwhelming, especially with the variety of options available on the market. However, by considering factors such as the type of baseboard material, the thickness of the wood, and the desired finish, you can make an informed decision. Whether you're working on a small home improvement project or a large-scale renovation, choosing the appropriate brad or finish nailer for baseboard installation will save you time, effort, and frustration. In this article, we’ll explore the key differences, benefits, and considerations to help you make the best choice.
Read also:The Ultimate Guide To La Unica Everything You Need To Know
Table of Contents
- What Makes a Brad Nailer Different from a Finish Nailer?
- Can a Brad Nailer Be Used for Baseboards?
- Is a Finish Nailer Better for Heavy-Duty Baseboards?
- Key Features to Look for in a Baseboard Nailer
- How to Use a Brad or Finish Nailer for Baseboards Effectively?
- What Are the Common Mistakes to Avoid When Using a Baseboard Nailer?
- How to Maintain Your Brad or Finish Nailer for Longevity?
- Frequently Asked Questions About Brad and Finish Nailers
What Makes a Brad Nailer Different from a Finish Nailer?
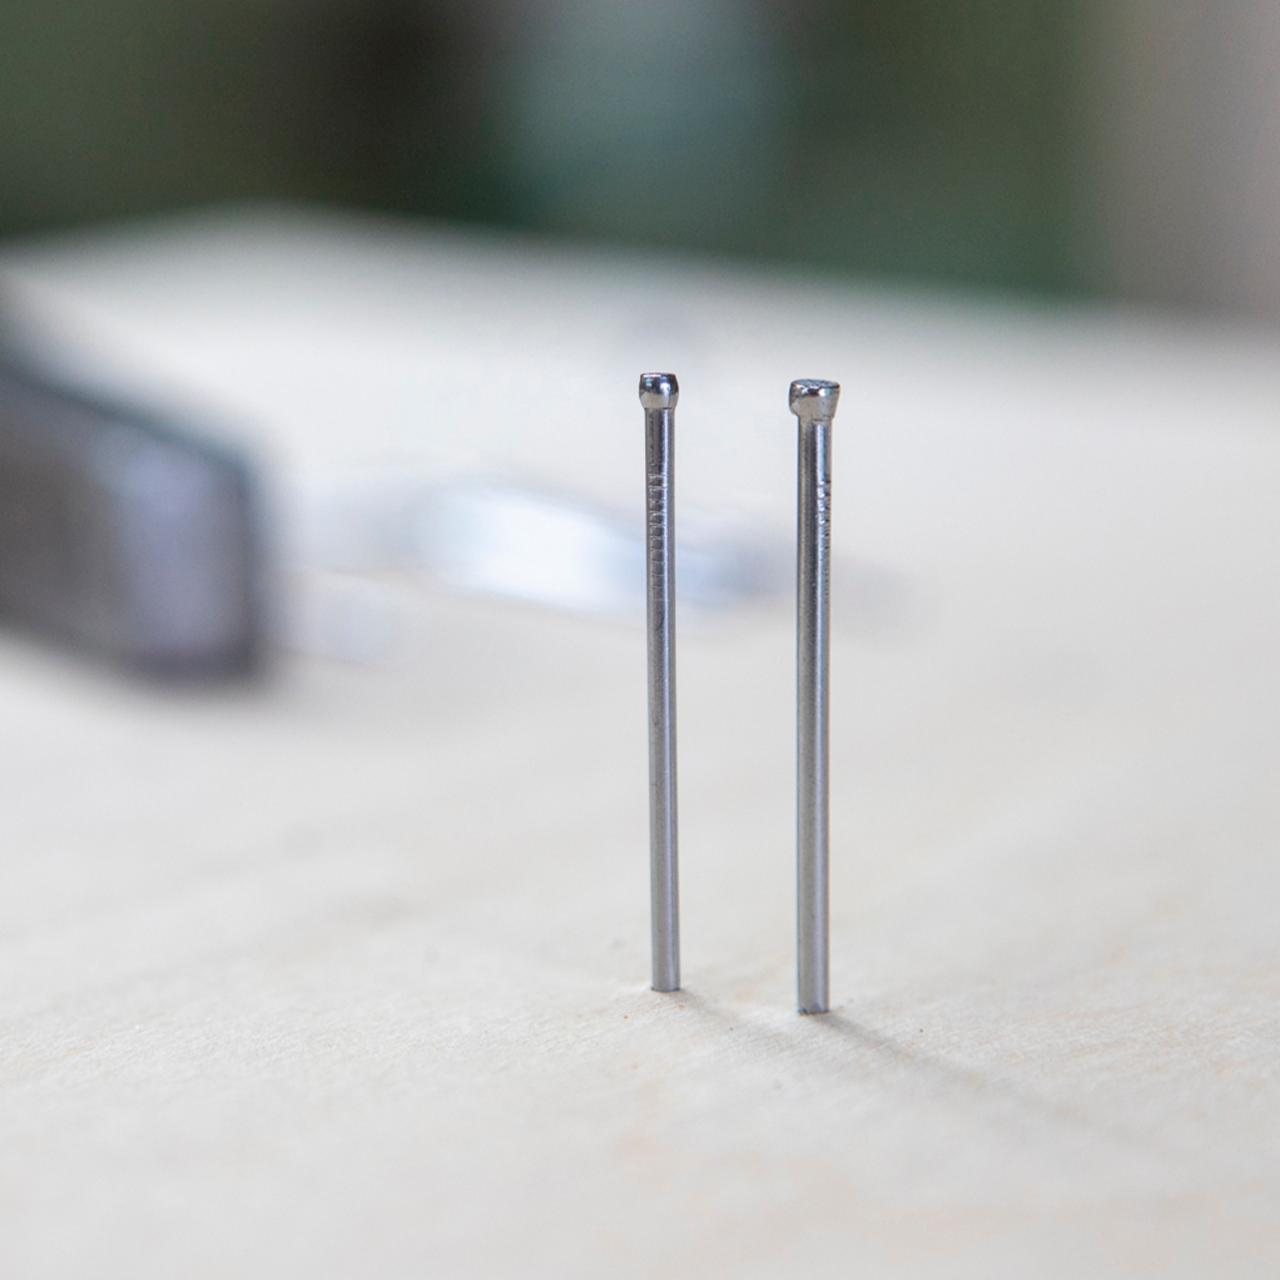
Understanding the differences between a brad nailer and a finish nailer is essential for selecting the right tool for your baseboard project. At first glance, both tools may appear similar, but their design, nail size, and applications set them apart. A brad nailer typically uses 18-gauge nails, which are thinner and less likely to split delicate materials like trim or molding. This makes it an excellent choice for lightweight baseboards and projects requiring precision.
On the other hand, a finish nailer operates with 15- or 16-gauge nails, which are thicker and provide a stronger hold. This makes it ideal for heavier baseboards and projects where durability is a priority. The larger nails of a finish nailer also mean that it can handle thicker materials without compromising the structural integrity of the installation. However, the trade-off is that the larger nails are more visible and may require additional touch-ups to conceal the nail holes.
When to Choose a Brad Nailer
A brad nailer is perfect for projects involving thinner materials, such as lightweight baseboards or decorative trim. Its smaller nails minimize the risk of splitting the wood, ensuring a clean and professional finish. Additionally, brad nailers are often more affordable and lightweight, making them a popular choice for DIY enthusiasts.
When to Opt for a Finish Nailer
If your project involves heavier baseboards or materials that require a stronger hold, a finish nailer is the better option. Its larger nails provide the necessary strength to secure thicker baseboards without compromising the installation. Finish nailers are also more versatile, making them suitable for a wider range of applications beyond baseboard installation.
Can a Brad Nailer Be Used for Baseboards?
Yes, a brad nailer can be used for baseboards, but its suitability depends on the type of baseboard material and the project requirements. For lightweight baseboards, such as those made from MDF or thinner wood, a brad nailer is an excellent choice. Its 18-gauge nails are thin enough to prevent splitting while still providing a secure hold. This makes it a popular option for projects where precision and a clean finish are paramount.
However, there are limitations to using a brad nailer for baseboards. Thicker or heavier baseboards may require a stronger hold than a brad nailer can provide. In such cases, the thinner nails of a brad nailer may not penetrate deeply enough to secure the baseboard firmly to the wall. Additionally, the smaller nails may not withstand the stress of expansion and contraction in environments with fluctuating temperatures and humidity levels.
Read also:Eden Eloise Holyfield The Rising Star Ndash Biography Achievements And Legacy
Advantages of Using a Brad Nailer for Baseboards
- Minimizes the risk of splitting delicate materials.
- Produces a cleaner finish with minimal visible nail holes.
- Lightweight and easy to handle, making it ideal for small projects.
Limitations of Using a Brad Nailer for Baseboards
- Not suitable for heavier or thicker baseboards.
- May require additional adhesive for a stronger hold.
- Smaller nails may not withstand environmental stress over time.
Is a Finish Nailer Better for Heavy-Duty Baseboards?
For heavy-duty baseboards, a finish nailer is often the better choice. Its 15- or 16-gauge nails provide a stronger hold, making it ideal for thicker materials and projects where durability is a priority. Whether you're installing solid wood baseboards or working on a large-scale renovation, a finish nailer ensures that your baseboards are securely fastened without compromising the installation.
One of the key advantages of a finish nailer is its versatility. Unlike a brad nailer, which is primarily used for lightweight materials, a finish nailer can handle a wide range of applications. From baseboards and crown molding to cabinetry and furniture assembly, a finish nailer is a versatile tool that can adapt to various project requirements. Its larger nails also mean that it can penetrate deeper into the material, providing a more secure hold.
Why Choose a Finish Nailer for Heavy-Duty Projects?
- Provides a stronger hold for thicker and heavier baseboards.
- Versatile and suitable for a wide range of applications.
- Penetrates deeper into materials for enhanced durability.
Potential Drawbacks of Using a Finish Nailer
- Larger nails may be more visible and require touch-ups.
- Heavier and bulkier, which may be less convenient for small projects.
- Higher cost compared to brad nailers.
Key Features to Look for in a Baseboard Nailer
When selecting a brad or finish nailer for baseboard installation, it's important to consider the key features that will enhance your experience and ensure optimal performance. One of the most important factors is the nail gauge, which determines the thickness of the nails used. For delicate baseboards, an 18-gauge brad nailer is ideal, while a 15- or 16-gauge finish nailer is better suited for heavier materials.
Another important feature is the magazine capacity. A larger magazine allows you to work for longer periods without needing to reload, which can save time and improve efficiency. Additionally, look for a nailer with adjustable depth settings, as this allows you to control how deep the nails penetrate the material. This is particularly useful when working with different types of baseboards and materials.
Additional Features to Consider
- Ergonomic design for comfort and ease of use.
- Tool-free jam release for quick and easy nail clearing.
- Durable construction for long-lasting performance.
How to Use a Brad or Finish Nailer for Baseboards Effectively?
Using a brad or finish nailer for baseboards effectively requires proper technique and attention to detail. Start by selecting the right nail gauge for your project. For lightweight baseboards, use an 18-gauge brad nailer, and for heavier materials, opt for a 15- or 16-gauge finish nailer. Ensure that the nailer is loaded with the appropriate nails and that the magazine is securely attached.
Before beginning the installation, practice on a scrap piece of wood to get a feel for the tool and adjust the depth settings as needed. Hold the nailer at a 90-degree angle to the baseboard and apply steady pressure when firing the nails. This ensures that the nails are driven straight into the material, providing a secure hold. Additionally, use a nail set to countersink the nails if necessary, and fill the holes with wood filler for a seamless finish.
Tips for Achieving Professional Results
- Always wear safety goggles to protect your eyes from flying debris.
- Use a stud finder to locate wall studs for added stability.
- Work slowly and methodically to avoid mistakes and ensure precision.
What Are the Common Mistakes to Avoid When Using a Baseboard Nailer?
Even experienced users can make mistakes when using a brad or finish nailer for baseboards. One common error is using the wrong nail gauge for the material. For example, using a finish nailer on delicate baseboards can result in splitting, while using a brad nailer on heavy materials may not provide a strong enough hold. Always match the nail gauge to the type of baseboard you're working with to avoid these issues.
Another mistake is failing to adjust the depth settings on the nailer. If the nails are driven too deeply, they can damage the baseboard, while nails that are too shallow may not provide a secure hold. Take the time to test the depth settings on a scrap piece of wood before beginning the installation. Additionally, avoid holding the nailer at an angle, as this can cause the nails to enter the material incorrectly and compromise the installation.
How to Prevent These Mistakes?
- Double-check the nail gauge and depth settings before starting.
- Use a level to ensure the baseboards are aligned correctly.
- Inspect the baseboards for defects before installation.
How to Maintain Your Brad or Finish Nailer for Longevity?
Proper maintenance is essential for extending the lifespan of your brad or finish nailer. Start by cleaning the tool after each use to remove dust, debris, and excess oil. Use a soft brush or cloth to wipe down the exterior, and use compressed air to clear any blockages in the magazine or nozzle. Regular cleaning prevents buildup that can affect the tool's performance and cause jams.
In addition to cleaning, it's important to lubricate the nailer regularly. Apply a few drops of pneumatic tool oil to the air inlet before each use to ensure smooth operation. Check the O-rings and seals for wear and tear, and replace them as needed to prevent air leaks. Finally, store the nailer in a dry, secure location to protect it from moisture and damage.
Steps for Routine Maintenance
- Clean the nailer after each use to remove debris.
- Lubricate the tool regularly with pneumatic tool oil.
- Inspect and replace worn parts, such as O-rings and seals.
Frequently Asked Questions About Brad and Finish Nailers
What is the difference between a brad nailer and